Welcome to our blog! 🌟 In this guide, we’ll walk you through an exciting update to a project many of you loved—uploading consumer data with images to Google Drive, displaying it in Google Sheets, and showcasing it in a web interface. 🚀
This update comes in response to a popular request from Ramdhan Shyam Suri: “How can we upload 2-3 images per consumer and manage them in the database?” So, here’s an enhanced version of the project that allows you to upload, edit, and manage multiple images seamlessly! 🛠️✨
🔑 Key Features of This Project
- Upload Multiple Images 📷📷📷: Attach multiple images for each consumer record.
- Data Table with Slideshow 🎞️: View uploaded images as a slideshow in the consumer records table.
- Edit and Update Records ✏️🔄: Modify data or replace images, and sync updates across Google Sheets and the web.
- Zoom-In Functionality 🔍: Click on images to view an enlarged version.
- Seamless Integration 🔗: Automatic synchronization between Google Drive, Google Sheets, and your web interface.
🔑 Youtube Video for Reference
🖥️ The Interface
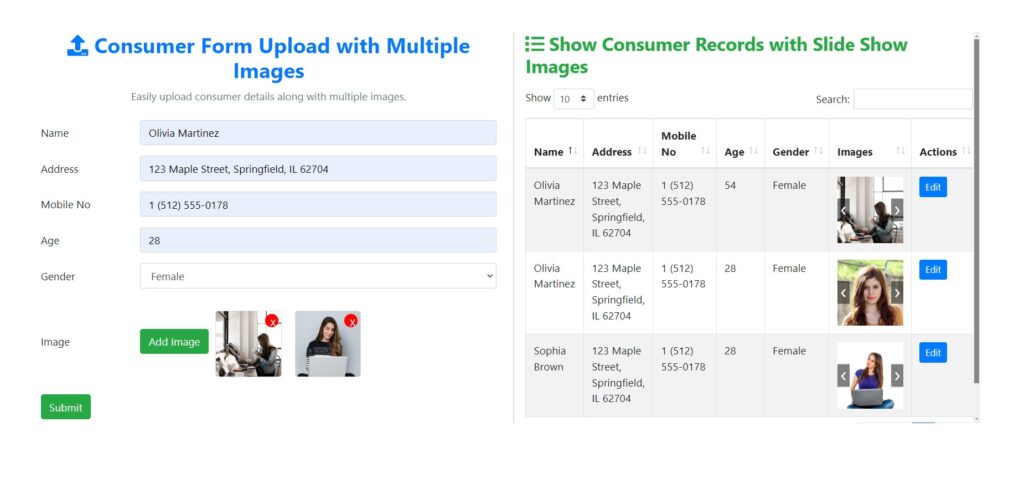
Consumer Form 📝
On the left-hand side, you’ll see the consumer form where you can input:
- Name 👤,
- Address 🏠,
- Mobile Number 📞,
- Age 🎂,
- Gender ⚧️,
- And now, upload multiple images by selecting them one at a time. 📤📤
Consumer Records Table 📋
On the right-hand side, you’ll find the consumer records displayed with their corresponding image slideshows. 🎥✨
🕹️ Step-by-Step Demo
1. Adding a New Record ➕
- Enter the consumer’s details (Name, Address, etc.). 🖊️
- Add images by selecting them one by one. 📸➡️📂
- Click Submit, and watch the process unfold: 🌟
- The Submit button gets temporarily disabled while the data uploads. ⏳
- A confirmation message (“Saved Successfully”) appears. ✅
- The new record instantly shows up in the Consumer Records Table with a working image slideshow. 🎞️
- In Google Sheets, images are displayed in consecutive columns—
F,G,H, etc. 📈
2. Editing and Updating Records ✍️🔄
- Click the Edit button next to any record. 🖱️✏️
- The record’s details and images will load into the form. 🖥️📤
- Modify the data or replace existing images with new ones. 🔄📷
- Click Submit, and the updates reflect across the web interface and Google Sheets. 💻🔗📊
3. Zooming In on Images 🔍📸
- Click on any image in the form or the data table to view a zoomed-in version, making it easy to inspect details. 👁️🗨️
🛠️ Setting It Up
Here’s how to integrate this project into your setup: 🛠️👇
- Make a Copy of the Script and Google Sheet 📄🔁
- Click on this link 🔗📥
- Click “Make a Copy” to create a copy in your Google account. 📝✅
- Create and Share a Google Drive Folder 📁🔗
- Create a folder (e.g.,
Consumer Images) to store uploaded images. 📂🖼️ - Set the folder’s sharing access to “Anyone with the link” and choose permissions as required (Viewer, Commenter, or Editor). 🌐🔒
- Copy the folder ID from the URL and paste it into the script under the
getFolderByIdmethod (line 24). 🖱️📋
- Create a folder (e.g.,
- Deploy the Script 🚀📜
- Deploy the script with a name like “Upload Images”. 🏷️✨
- Set access permissions (e.g., “Anyone with Google Account”). 🔐👥
- Authorize permissions when prompted. 🛡️✅
- Run and Test the Setup 🧪🔧
- Copy the deployment link, paste it in your browser, and start testing the interface. 🌐🖥️
- If images don’t show in Google Sheets initially, click “Allow” when prompted and refresh the page. 🔄✅
🌟 Why This Update is a Game-Changer
This project simplifies managing multiple images per record, making it perfect for: 🎯✨
- Consumer databases 📊👥,
- Product catalogs 📚🛒,
- Event registrations 📝🎉, and more.
You no longer have to deal with the hassle of managing images manually across platforms. This integrated solution ensures your data stays synchronized and visually appealing in both your Google Sheets and web interface. 💼🔗🖥️
🎉 Conclusion
We hope you find this guide helpful for your projects. If you’d like to see more tutorials like this, feel free to explore our other posts or leave a comment with your suggestions. 📝💡
If you’re new here, don’t forget to subscribe to our newsletter 📬 and follow us for more updates, tips, and tricks. 👍🔔
Until next time, happy coding! 😊👩💻👨💻
📌 Quick Recap with Icons
- Upload Multiple Images 📷📷📷
- Slideshow in Data Table 🎞️
- Edit & Update ✍️🔄
- Zoom-In on Images 🔍📸
- Seamless Integration 🔗
I really like how you create CMS with google sheet ang apps script.
Please contact me!
Hi.. Do you need any support.